Unity Integration Documentation
The documentation below is a step by step guide that will help you integrate RevenappSDK with Unity.
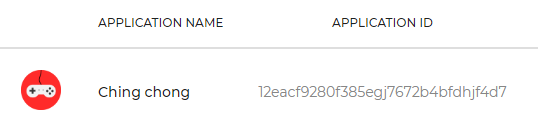
Register your app on Revenapp platform for obtaining API key
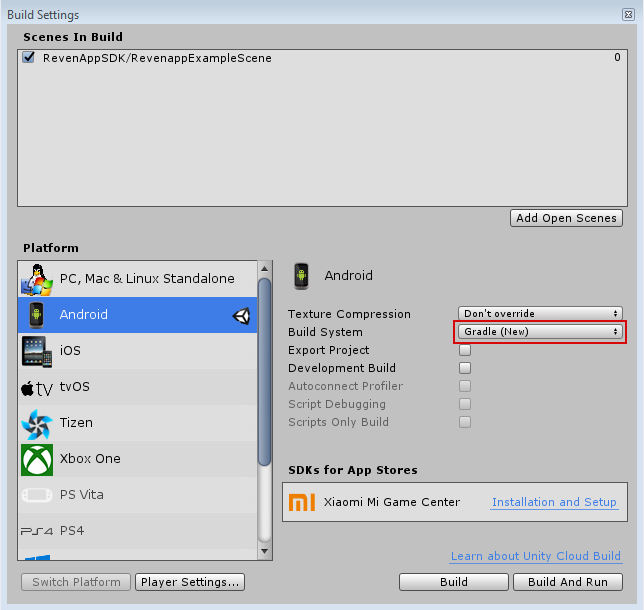
Gradle build system is required for projects with RevenappSDK.
Even though using Unity 5.x is possible we strongly recommend to use the version not lower than Unity 2017.1.
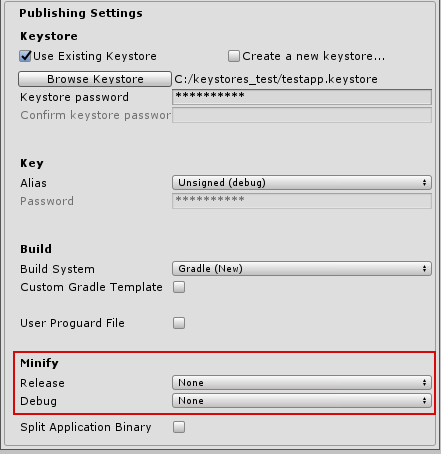
It is also not recommended to use Minify or Proguard options. Otherwise, we can’t guarantee the correct work of SDK.
The latest version of SDK you can download from our site here
1: Choose in the menu Assets → Import Package → Custom Package… and select RevenappSDK unitypackage.
2: Double click uploaded unitypackage file.
3: Drag and drop unitypackage file into Assets folder in opened Unity project.
-
4: In the new window press Import button.
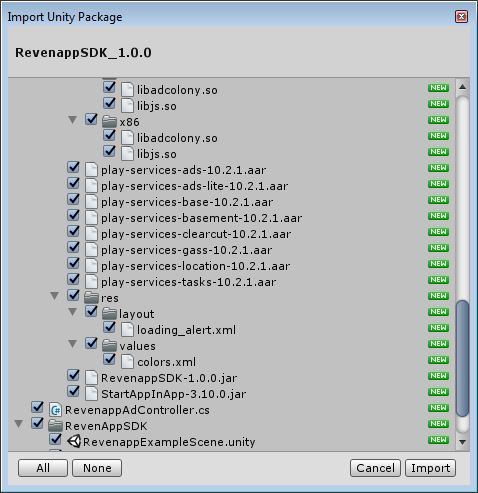
RevenappSDK contains AndroidSupport, Play Services and Google's Play Services Resolver libraries needed for its work. Please note, that currently it is important to have Play-Services libraries version 10.2.1
Folder Assets/RevenappSDK contains test scene RevenappExampleScene, where you can see an example of test advertising and how SDK works.
Before starting work with Revenapp you will need to initialize SDK by entering app key, that you can get from a dashboard on our website.
using UnityEngine;
using RevenappSDK;

public class RevenappInit : MonoBehaviour {
    void Start ()
    {
        Revenapp.Init("YOUR_APP_KEY");
    }
}
To test how SDK works and view test advertising use the following test key:
a5e44da68c6b84561d0906479774e14f
SDK, initialized with this key will only show test advertising. You can see the example in Example Scene.
After initialization RevenappSDK checks availability of advertising with certain time frequency. Default frequency is 10 seconds (minimum value).
To set this value manually call method AutoCacheDelay() and enter the needed frequency in seconds.
Revenapp.AutoCacheDelay(20);
Before you start advertising make sure that initialization is completed (this might take some time) by calling method
Revenapp.IsInitializedSDK();
To check the availability of certain type of advertising for display call method
Revenapp.IsAdReady(AdType type);
    if (Revenapp.IsInitializedSDK())
    {
        if (Revenapp.IsAdReady(AdType.Interstitial))
        {
            Revenapp.ShowAd(AdType.Interstitial);
        }
    }
    if (Revenapp.IsInitializedSDK())
    {
        if (Revenapp.IsAdReady(AdType.RewardedVideo))
        {
            Revenapp.ShowAd(AdType.RewardedVideo);
        }
    }
To show banner call method Revenapp.ShowAd(), entering in advertising type parameter - banner, and position for display (Top or Bottom).
    if (Revenapp.IsInitializedSDK())
    {
        if (Revenapp.IsBannerReady())
        {
            Revenapp.ShowBanner(AdPosition.Top);
        }
    }
Method HideBanner() hides last banner. Example:
Revenapp.HideBanner();
If you want to have more control over you and behavior you can setup callbacks which are optional
    private InterstitialAdDisplayListener InterstitialAdEventListener;
    private RewardedAdDisplayListener RewardedAdEventListener;
    ...
    InterstitialAdEventListener = new InterstitialAdDisplayListenerImplementation();
    RewardedAdEventListener = new RewardedAdDisplayListenerImplementation();
    ...
    Revenapp.SetInterstitialAdListener(InterstitialAdEventListener);
    Revenapp.SetRewardedAdListener(RewardedAdEventListener);
    ...
    public class RewardedAdDisplayListenerImplementation : RewardedAdDisplayListener
    {
        public void onRewardedVideoClosed()
        {
            Debug.Log("onRewardedVideoClosed");
        }

        public void onRewardedVideoFinished()
        {
            Debug.Log("onRewardedVideoFinished");
        }

        public void onRewardedVideoLoaded()
        {
            Debug.Log("onRewardedVideoLoaded");
        }

        public void onRewardedVideoShown()
        {
            Debug.Log("onRewardedVideoShown");
        }
    }

    public class InterstitialAdDisplayListenerImplementation : InterstitialAdDisplayListener
    {
        public void adDisplayed()
        {
            Debug.Log("adDisplayed");
        }

        public void adHidden()
        {
            Debug.Log("adHidden");
        }
    }
Each app added to the system is checked manually, the process that might take up to 24 hours. During this time the app will have PENDING status in the dashboard.
After the manual check is completed the status will change to Awaiting SDK initialization meaning that now you need to add SDK into your project and make at least one request of test advertising.
After that the status will change to IN PROGRESS. This status means that we are in the process of choosing the best advertising campaigns for your app, the process that might take from 24 to 48 hours.
Once we finish setting relevant advertising campaigns the status will change to ACTIVE, now you can update your app in Google Play and earn more money than you used to. And don’t rush with your conclusions, to fully appreciate all the benefits of using our SDK and to reach the maximum efficiency will take another 3-7 days, when we make a second tuning of all sponsors to maximize your earnings.
If your Android project exceeds DEX limit – in other words if your app has over 64K methods, you will need to use Multidex to overcome this limitation. You can get more detailed information on that and learn how to enable Multidex in Android projects from the official Android documentation for developers. There are some steps needed to implement setup required for Multidex.
We strongly recommend enabling Multidex, but if for some reason it is not an option for you, then you can contact our support and ask for advice on how to minimize SDK to have fewer methods. Although you should understand that this inevitably will affect your performance metrics. Due to the differences between Gradle and the default Unity Android build system, some existing projects may be hard to convert to Gradle. You can either build the output package (APK) using the Gradle build system in Unity, or export the Gradle project and build it in an external tool (such as Android Studio).
To learn more, see Gradle’s resources on Getting Started with Gradle for Android Build.
Gradle is not supported in Unity 5.4 and below, meaning that one will have to export project to Android Studio first while also migrating to Gradle platform. After project is exported just follow official Android documentation on how to enable Multidex. When Multidex is enabled you will need to make debug/release builds using Android Studio (or Gradle directly). In Unity 5.5 and above, Unity started supporting Gradle build system. That means you don’t need to export your project and can just enable Multidex directly. There are 3 steps to do that:
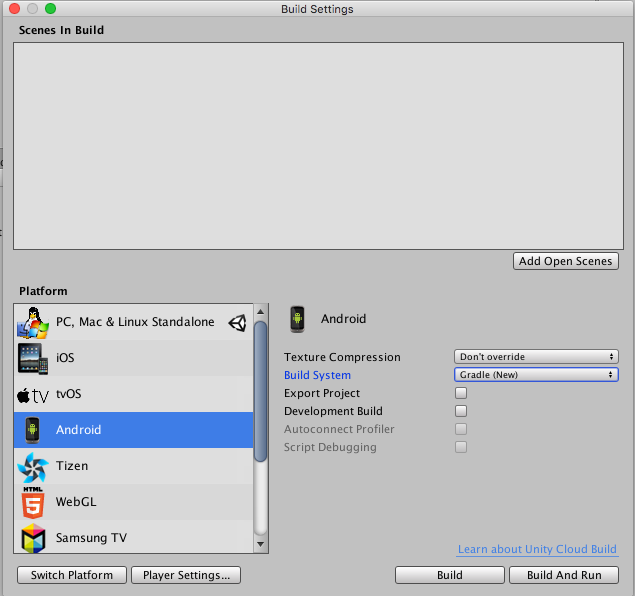
To build your Android build with Gradle in Unity:
1. In the Unity Editor, open the Build Settings window (menu: File > Build Settings…)
2. In the Platform list, select Android
-
3. Set the Build System drop-down to Gradle (new), then click Build
If your Android Player settings have minimum API level set to 20 or lower you will need to perform the following procedure. Update your manifest file located in Assets/Plugins/Android/AndroidManifest.xml. If you don’t have this manifest file then you will need to create one. Default AndroidManifest.xml can be found in Unity installation location. In it you will need to manually enter project settings of your app: package name, permissions, configuration options and other information. For more information about the Android Manifest file, refer to the Android Developer documentation on Android Manifests.
android:name="android.support.multidex.MultiDexApplication"
Copy folders assets, jniLibs, libs into the folder of your project /src/main.
In gradle-file of your project build.gradle (Project: XXXXX) in repositories block in allprojects block add
    allprojects {
        repositories {
            google()
            jcenter()
            flatDir {
                dirs 'src/main/libs'
            }
        }
    }
In gradle-file of your module build.gradle (Module: XXXXX) in dependencies block add:
    implementation 'com.android.support:appcompat-v7:27.1.1'
    implementation 'com.android.support.constraint:constraint-layout:1.1.3'

    implementation 'com.android.support:animated-vector-drawable:27.1.1'
    implementation 'com.android.support:customtabs:27.1.1'
    implementation 'com.android.support:recyclerview-v7:27.1.1'
    implementation 'com.android.support:support-annotations:27.1.1'
    implementation 'com.android.support:support-core-ui:27.1.1'
    implementation 'com.android.support:support-core-utils:27.1.1'
    implementation 'com.android.support:support-fragment:27.1.1'
    implementation 'com.android.support:support-media-compat:27.1.1'
    implementation 'com.android.support:support-v4:27.1.1'
    implementation 'com.android.support:support-vector-drawable:27.1.1'

    implementation 'com.google.android.gms:play-services-ads:10.2.1'
    implementation 'com.google.android.gms:play-services-ads-lite:10.2.1'
    implementation 'com.google.android.gms:play-services-base:10.2.1'
    implementation 'com.google.android.gms:play-services-basement:10.2.1'
    implementation 'com.google.android.gms:play-services-clearcut:10.2.1'
    implementation 'com.google.android.gms:play-services-gass:10.2.1'
    implementation 'com.google.android.gms:play-services-location:10.2.1'
    implementation 'com.google.android.gms:play-services-tasks:10.2.1'

    implementation 'android.arch.core:common:1.0.0'
    implementation 'android.arch.lifecycle:common:1.0.0'
    implementation 'android.arch.lifecycle:runtime:1.0.0'

    implementation (name:'SOMAAndroid-9.0.0-release',ext:'aar')
    implementation (name:'AppnextAndroidSDK',ext:'aar')
    implementation (name:'RevenappBoosterLib',ext:'aar')
    implementation (name:'Revenapp-admodule',ext:'aar')

    implementation files('src/main/libs/appodeal-2.1.11.jar')
    implementation files('src/main/libs/appodeal-banner-view-1.3.0.jar')
    implementation files('src/main/libs/StartAppInApp-3.10.0.jar')

    implementation files('src/main/libs/Revenappsdk-1.0.2.jar')
There should be following lines added in manifest
	<!--IronSource-->
	<activity
		android:name="com.ironsource.sdk.controller.ControllerActivity"
		android:configChanges="orientation|screenSize"
		android:hardwareAccelerated="true" />
	<activity
		android:name="com.ironsource.sdk.controller.InterstitialActivity"
		android:configChanges="orientation|screenSize"
		android:hardwareAccelerated="true"
		android:theme="@android:style/Theme.Translucent" />
	<activity
		android:name="com.ironsource.sdk.controller.OpenUrlActivity"
		android:configChanges="orientation|screenSize"
		android:hardwareAccelerated="true"
		android:theme="@android:style/Theme.Translucent" />
	<!--/IronSource-->
	<!-- Appodeal -->
	<activity android:name="com.appodeal.ads.InterstitialActivity"
		android:configChanges="orientation|screenSize"
		android:theme="@android:style/Theme.NoTitleBar.Fullscreen" />
	<activity android:name="com.appodeal.ads.VideoActivity"
		android:configChanges="orientation|screenSize"
		android:theme="@android:style/Theme.NoTitleBar.Fullscreen" />
	<activity android:name="com.appodeal.ads.LoaderActivity"
		android:configChanges="orientation|screenSize"
		android:theme="@android:style/Theme.NoTitleBar.Fullscreen" />
	<activity android:name="com.appodeal.ads.VideoPlayerActivity"
		android:theme="@android:style/Theme.Black.NoTitleBar.Fullscreen"/>
	<receiver android:name="com.appodeal.ads.AppodealPackageAddedReceiver" android:exported="true" android:enabled="true">
		<intent-filter>
			<action android:name="android.intent.action.PACKAGE_ADDED" />
			<data android:scheme="package" />
		</intent-filter>
	</receiver>
	<activity android:name="com.appodeal.ads.TestActivity"
		android:theme="@android:style/Theme.Translucent.NoTitleBar" />
	<activity android:name="com.appodeal.ads.networks.vpaid.VPAIDActivity"
		android:theme="@android:style/Theme.NoTitleBar.Fullscreen" />

	<activity android:name="org.nexage.sourcekit.vast.activity.VASTActivity"
		android:theme="@android:style/Theme.NoTitleBar.Fullscreen"
		android:configChanges="keyboardHidden|orientation|screenSize"/>
	<activity android:name="org.nexage.sourcekit.vast.activity.VPAIDActivity"
		android:theme="@android:style/Theme.NoTitleBar.Fullscreen" />

	<activity android:name="com.amazon.device.ads.AdActivity" android:configChanges="keyboardHidden|orientation|screenSize"/>
	<activity android:name="com.my.target.ads.MyTargetActivity" android:configChanges="keyboard|keyboardHidden|orientation|screenLayout|uiMode|screenSize|smallestScreenSize"
		android:hardwareAccelerated="true"/>

	<activity android:name="com.mopub.mobileads.MoPubActivity"
		android:configChanges="keyboardHidden|orientation|screenSize"
		android:theme="@android:style/Theme.Translucent" />
	<activity android:name="com.mopub.common.MoPubBrowser"
		android:configChanges="keyboardHidden|orientation|screenSize" />
	<activity android:name="com.mopub.mobileads.MraidActivity"
		android:configChanges="keyboardHidden|orientation|screenSize" />
	<activity android:name="com.mopub.mobileads.MraidVideoPlayerActivity"
		android:configChanges="keyboardHidden|orientation|screenSize" />
	<activity android:name="com.mopub.mobileads.RewardedMraidActivity"
		android:configChanges="keyboardHidden|orientation|screenSize"/>

	<activity android:name="com.google.android.gms.ads.AdActivity" android:configChanges="keyboard|keyboardHidden|orientation|screenLayout|uiMode|screenSize|smallestScreenSize"/>
	<!-- /Appodeal -->

	<!--AdClony -->
	<activity android:name="com.adcolony.sdk.AdColonyInterstitialActivity"
		android:configChanges="keyboardHidden|orientation|screenSize"
		android:hardwareAccelerated="true"/>
	<activity android:name="com.adcolony.sdk.AdColonyAdViewActivity"
		android:configChanges="keyboardHidden|orientation|screenSize"
		android:hardwareAccelerated="true"/>
	<!--/Adcolony-->

	<!-- Fyber -->
	<activity
		android:name="com.fyber.ads.interstitials.InterstitialActivity"
		android:configChanges="screenSize|orientation"
		android:theme="@android:style/Theme.Translucent" />
	<activity
		android:configChanges="screenSize|orientation"
		android:name="com.fyber.ads.videos.RewardedVideoActivity"
		android:hardwareAccelerated="true"/>
	<!--/Fyber-->

	<!-- Applovin -->
	<activity android:name="com.applovin.adview.AppLovinInterstitialActivity"
		android:configChanges="orientation|screenSize"/>
	<activity android:name="com.applovin.adview.AppLovinConfirmationActivity" />
	<!-- /Applovin -->

	<!-- Adbuddiz -->
	<activity android:name="com.purplebrain.adbuddiz.sdk.AdBuddizActivity"
		android:theme="@android:style/Theme.Translucent" />
	<!-- /Adbuddiz -->

	<!-- Unity Ads -->
	<activity android:name="com.unity3d.ads.adunit.AdUnitActivity"
		android:configChanges="fontScale|keyboard|keyboardHidden|locale|mnc|mcc|navigation|orientation|screenLayout|screenSize|smallestScreenSize|uiMode|touchscreen"
		android:theme="@android:style/Theme.NoTitleBar.Fullscreen" android:hardwareAccelerated="true" />
	<!-- /Unity Ads -->


	<activity android:name="com.unity3d.ads.adunit.AdUnitSoftwareActivity"
		android:configChanges="fontScale|keyboard|keyboardHidden|locale|mnc|mcc|navigation|orientation|screenLayout|screenSize|smallestScreenSize|uiMode|touchscreen"
		android:theme="@android:style/Theme.NoTitleBar.Fullscreen" android:hardwareAccelerated="false" />
	<activity android:name="com.unity3d.ads2.adunit.AdUnitActivity"
		android:configChanges="fontScale|keyboard|keyboardHidden|locale|mnc|mcc|navigation|orientation|screenLayout|screenSize|smallestScreenSize|uiMode|touchscreen"
		android:theme="@android:style/Theme.NoTitleBar.Fullscreen" android:hardwareAccelerated="true" />
	<activity android:name="com.unity3d.ads2.adunit.AdUnitSoftwareActivity"
		android:configChanges="fontScale|keyboard|keyboardHidden|locale|mnc|mcc|navigation|orientation|screenLayout|screenSize|smallestScreenSize|uiMode|touchscreen"
		android:theme="@android:style/Theme.NoTitleBar.Fullscreen" android:hardwareAccelerated="false" />


	<!-- RevMob-->
	<activity
		android:name="com.revmob.FullscreenActivity"
		android:configChanges="keyboardHidden|orientation" >
	</activity>
	<!--/RevMob-->

	<!--ChartBoost-->
	<activity android:name="com.chartboost.sdk.CBImpressionActivity"
		android:excludeFromRecents="true"
		android:hardwareAccelerated="true"
		android:theme="@android:style/Theme.NoTitleBar.Fullscreen"
		android:configChanges="keyboardHidden|orientation|screenSize" />
	<!--/ChartBoost-->

	<!--rm-->
	<activity android:name="rm.com.android.sdk.RmInterstitial" android:configChanges="keyboardHidden|orientation|screenSize">
	</activity>
	<!--/rm-->

	<!-- Vungle -->
	<activity android:name="com.vungle.publisher.VideoFullScreenAdActivity"
		android:configChanges="keyboardHidden|orientation|screenSize|screenLayout|smallestScreenSize"
		android:theme="@android:style/Theme.NoTitleBar.Fullscreen"/>
	<activity android:name="com.vungle.publisher.MraidFullScreenAdActivity"
		android:configChanges="keyboardHidden|orientation|screenSize|screenLayout|smallestScreenSize"
		android:theme="@android:style/Theme.Translucent.NoTitleBar.Fullscreen"/>
	<activity android:name="com.vungle.publisher.FlexViewAdActivity"
		android:configChanges="keyboardHidden|orientation|screenSize|screenLayout|smallestScreenSize"
		android:theme="@android:style/Theme.Translucent.NoTitleBar.Fullscreen"/>
	<!-- /Vungle -->

	<!-- StartApp -->
	<activity android:name="com.startapp.android.publish.ads.list3d.List3DActivity"
		android:theme="@android:style/Theme" />

	<activity android:name="com.startapp.android.publish.adsCommon.activities.OverlayActivity"
		android:theme="@android:style/Theme.Translucent"
		android:configChanges="orientation|keyboardHidden|screenSize" />

	<activity android:name="com.startapp.android.publish.adsCommon.activities.FullScreenActivity"
		android:theme="@android:style/Theme"
		android:configChanges="orientation|keyboardHidden|screenSize" />
	<service android:name="com.startapp.android.publish.common.metaData.PeriodicMetaDataService" />
	<service android:name="com.startapp.android.publish.common.metaData.InfoEventService" />
	<receiver android:name="com.startapp.android.publish.common.metaData.BootCompleteListener" >
		<intent-filter>
			<action android:name="android.intent.action.BOOT_COMPLETED" />
		</intent-filter>
	</receiver>
<!-- /StartApp -->Before starting work with Revenapp you will need to initialize SDK by entering app key, that you can get from a dashboard on our website and Activity object.
//...
import com.mediation.sdk.Developers.RevenAppSDK;
public class MainActivity extends AppCompatActivity {
    @Override
    protected void onCreate(Bundle savedInstanceState) {
        super.onCreate(savedInstanceState);
        //...
        Activity activity = this;
        RevenAppSDK.instance().Initialize(activity, "YOUR_APP_KEY");
    }
}
To test how SDK works and view test advertising use the following test key:
a5e44da68c6b84561d0906479774e14f
SDK, initialized with this key will only show test advertising.
After initialization RevenappSDK checks availability of advertising with certain time frequency. Default frequency is 10 seconds (minimum value). To set this value manually call method AutoCacheDelay() and enter the needed frequency in seconds.
RevenAppSDK.instance().AutoCacheDelay(10);
Before you start advertising make sure that initialization is completed (this might take some time) by calling method
RevenAppSDK.instance().isInitializedSDK().
To check the availability of certain type of advertising for display call method
RevenAppSDK.instance().isReadyAd(String type)
    if (RevenAppSDK.instance().isInitializedSDK())
    {
        if (RevenAppSDK.instance().isReadyAd("Interstitial"))
        {
            RevenAppSDK.instance().ShowAd("Interstitial", -32);
        }
    }
    if (RevenAppSDK.instance().isInitializedSDK())
    {
        if (RevenAppSDK.instance().isReadyAd("RewardedVideo"))
        {
            RevenAppSDK.instance().ShowAd("RewardedVideo", -32);
        }
    }
Banner position is set by the following parameter like int Top = 16 Bottom = 8
    if (RevenAppSDK.instance().isInitializedSDK())
    {
        if (RevenAppSDK.instance().isReadyAd("Banner"))
        {
            RevenAppSDK.instance().ShowAd("Banner", 16);
        }
    }
If you want to have more control over you and behavior you can setup callbacks which are optional
RevenAppSDK.instance().SetInterstitialAdListener(new InterstitialAdDisplayListener() {
@Override
public void adHidden() {

}

@Override
public void adDisplayed() {

}
});

RevenAppSDK.instance().SetRewardedAdListener(new RewardedAdDisplayListener() {
@Override
public void onRewardedVideoLoaded() {

}

@Override
public void onRewardedVideoShown() {

}

@Override
public void onRewardedVideoClosed() {

}

@Override
public void onRewardedVideoFinished() {

}
});
Using your Google account register account with AdMob if you have not done this before.
In order to simplify the process of integrating advertising from AdMob we have automated most of operations. All you will need to do is just to download our extension for Google Chrome from official Chrome Web Store.
In order to simplify the process of integrating advertising from AdMob we have automated most of operations. All you will need to do is just to download our extension for Google Chrome from official Chrome Web Store. You can download it from here
For the correct work of Revenapp extension you will need to turn off other extensions blocking web advertising. You can turn them on after completing synchronization.
In order to synchronize your Revenapp account with AdMob you will need to perform following consecutive actions with the help of Revenapp extension.
Now, after initialization SDK will include all the information needed for correct work of advertising from AdMob. All information about impressions and earnings will be included into statistics available in your account’s dashboard.
If you add new apps into your Revenapp account later you can use extension again to synchronize those apps with your AdMob account.